This guide provides a high-level overview of using the Confirmatory Analysis Kit, but it does not replace official Intelligent Fingerprinting training, the product instructions for use, or your organisation’s drug and alcohol policy. Proper training helps ensure that samples are collected, documented, packaged, and sent correctly. It also supports a clear chain of custody from donor collection through to laboratory analysis.
Looking down and spotting a non-negative drug test is a stressful moment.
At this stage, accuracy, consistency, documentation, and chain of custody are vital. The initial screen is not a confirmed positive result. Laboratory confirmatory analysis is required to verify whether the drug or drugs are present.
In this guide, we explain how trained administrators can use the Confirmatory Analysis Kit after a non-negative screening result, helping employers protect sample integrity, maintain the chain of custody, and support evidence-based decision-making.
Handled correctly, confirmatory testing protects both the organisation and the employee. It helps ensure decisions are fair, documented, and based on verified laboratory evidence.
Before You Begin: Training and Policy Matter
Confirmatory testing must always be carried out by trained personnel.
Your drug and alcohol policy should define how non-negative screening results are managed, who is responsible for each stage, and what action can be taken while confirmatory results are pending.
Consistency matters. A clear process helps protect the organisation, the employee, and the credibility of the testing programme.
Step 1: Complete the Documentation
Accurate documentation is critical to a confirmatory drug test. Begin by completing all necessary paperwork before collecting any samples. Ask the donor to sign their section on the form.
Before collecting any samples:
- Complete all required paperwork.
- Ask the donor to sign their section of the Consent Form.
- Confirm the required details are clear and accurate.
Next, prepare the donor for sample collection:
- Instruct them to wash their hands thoroughly twice. Each wash should last forty-five seconds.
- Record the handwashing times on the Consent Form.
- Ensure the donor waits fifteen minutes without touching anything.
Assist the donor with doors, taps, and security passes where necessary. This step prevents contamination and ensures sample integrity. Accurate documentation supports compliance, protects the chain of custody, and helps ensure the result can be correctly matched to the donor and the original screening process.
Step 2: Collect the Samples
Once the paperwork is complete and the donor has waited 15 minutes without touching anything, collect the sample.
Ask the donor to:
- Place each fingertip on the sample pad of the Confirmation Cartridge for five seconds.
- Provide samples from all ten fingertips.
After collection:
- The donor closes the tamper-evident cover.
- Only after the tamper-evident cover has closed can the administrator safely handle the cartridge.
- Record the collection time on the Consent Form immediately after the first sample has been collected.
Repeat the process with a second cartridge, then apply the correct barcodes to both cartridges.
This process ensures that:
- Samples are securely linked to the donor.
- The chain of custody is maintained.
- Laboratory analysis can be accurately matched to the original test.
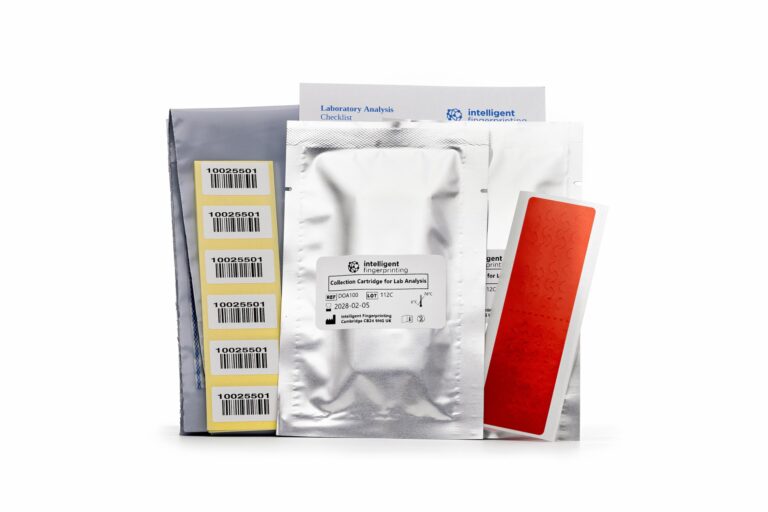
Step 3: Package and Send the Samples
Proper packaging and documentation maintain a secure chain of custody throughout the confirmatory drug test process. To package the samples correctly:
- Attach a barcode from the kit to the tamper-evident bag.
- Attach barcodes to all copies of the Consent Form.
- Review the Consent Form with the donor.
- Obtain the donor’s signature.
- Complete all remaining documentation carefully.
Then:
- Seal the cartridges inside the tamper-evident bag.
- Place the sealed bag into the bubble wrap packaging.
- Include the pink copy of the Consent Form and any remaining barcodes in the postage-paid envelope.
- Provide the white copy to the donor.
- Retain the yellow copy for your records.
Step 4: Follow Your Policy for Next Steps
After the Confirmatory Analysis Kit samples have been sent to the laboratory, the employer’s focus should shift to managing the interim period fairly and consistently.
At this stage:
- Do not make assumptions about the outcome.
- Do not treat the non-negative screening result as a confirmed positive result.
- Do not take action outside of your defined policy.
- Do not make final employment decisions until confirmatory results are received.
Your drug and alcohol policy should clearly outline the steps to take. This may include:
- Temporary removal from safety-critical duties.
- Suspension on full pay while awaiting results.
- Formal review processes once the results are confirmed.
Only laboratory analysis can confirm a positive, often using advanced analytical methods.
Any action taken should be based on confirmed results, not the initial screening outcome. Consistency is crucial. Following your policy helps protect both the organisation and the employee, while supporting fairness, compliance, and trust in the process.
Why Confirmation Lab Testing Matters
Confirmatory testing ensures the credibility of your drug testing programme.
Confirmatory tests:
- Verify screening results
- Remove uncertainty
- Protect employee rights
- Support compliant, evidence-based decisions
Without confirmatory testing, a non-negative screening result is incomplete. It should not be treated as a confirmed positive result or used as the sole basis for final employment decisions.
Prevention Is the Strongest Step
A non-negative screening result indicates your business may already have been exposed to risk. At that point, the focus shifts to managing the outcome, protecting the employee, and following the correct confirmatory process.
The stronger approach is to reduce the likelihood that risk enters the workplace in the first place.
Clear communication is key. When the process is explained clearly, employees are more likely to trust it, engage with it, and see testing as a safety measure rather than a punishment. To learn more about how prevention, communication, and fair testing processes can support a stronger workplace drug testing programme, read our blog on managing employee pushback.
Additionally, employers can download our free printable drug testing resource pack. This resource pack includes posters, employee guidance, and management support materials that can be displayed on-site, shared during inductions, or used in internal communications.
Download the free drug testing resource pack to help educate employees and support clearer conversations about workplace drug testing.
Next Steps
When trained administrators follow the correct process, employers can protect sample integrity, maintain the chain of custody, and ensure decisions are based on verified laboratory evidence.
This builds trust, supports compliance, and strengthens the credibility of the workplace drug testing programme.
If you would like to see the Confirmatory Analysis Kit in action, you can book a demonstration of the Intelligent Fingerprinting Drug Screening System. Our team can walk you through how the system works, how confirmatory analysis fits into the testing process, and what employers need to consider after a non-negative screening result.
You can also speak to our team about official training and implementation support to help ensure your administrators are confident, consistent, and prepared to follow the correct process.